
FOOD & BEV WITH THE DUNHAMS
IT’S A BIRD, IT’S A PLANE, IT’S ANOTHER FOOD BLOG
Welcome to the Food & Bev with the Dunhams Blog. We are so excited to share some of our favorite food and drink recipes from the restaurant (and maybe some that aren’t!) We’ll provide the recipes (minus the ridiculous amounts of scrolling), and humor while you do the creating! Feel free to reach out and ask for specific recipes y’all want to see on the blog and post and tag us on social media with your successes!
Cheers!
Chip & Amanda Dunham

Local Beef and Pork Meatballs with Mushroom Gravy & Pasta
Easy Meatballs and Pasta for dinner!
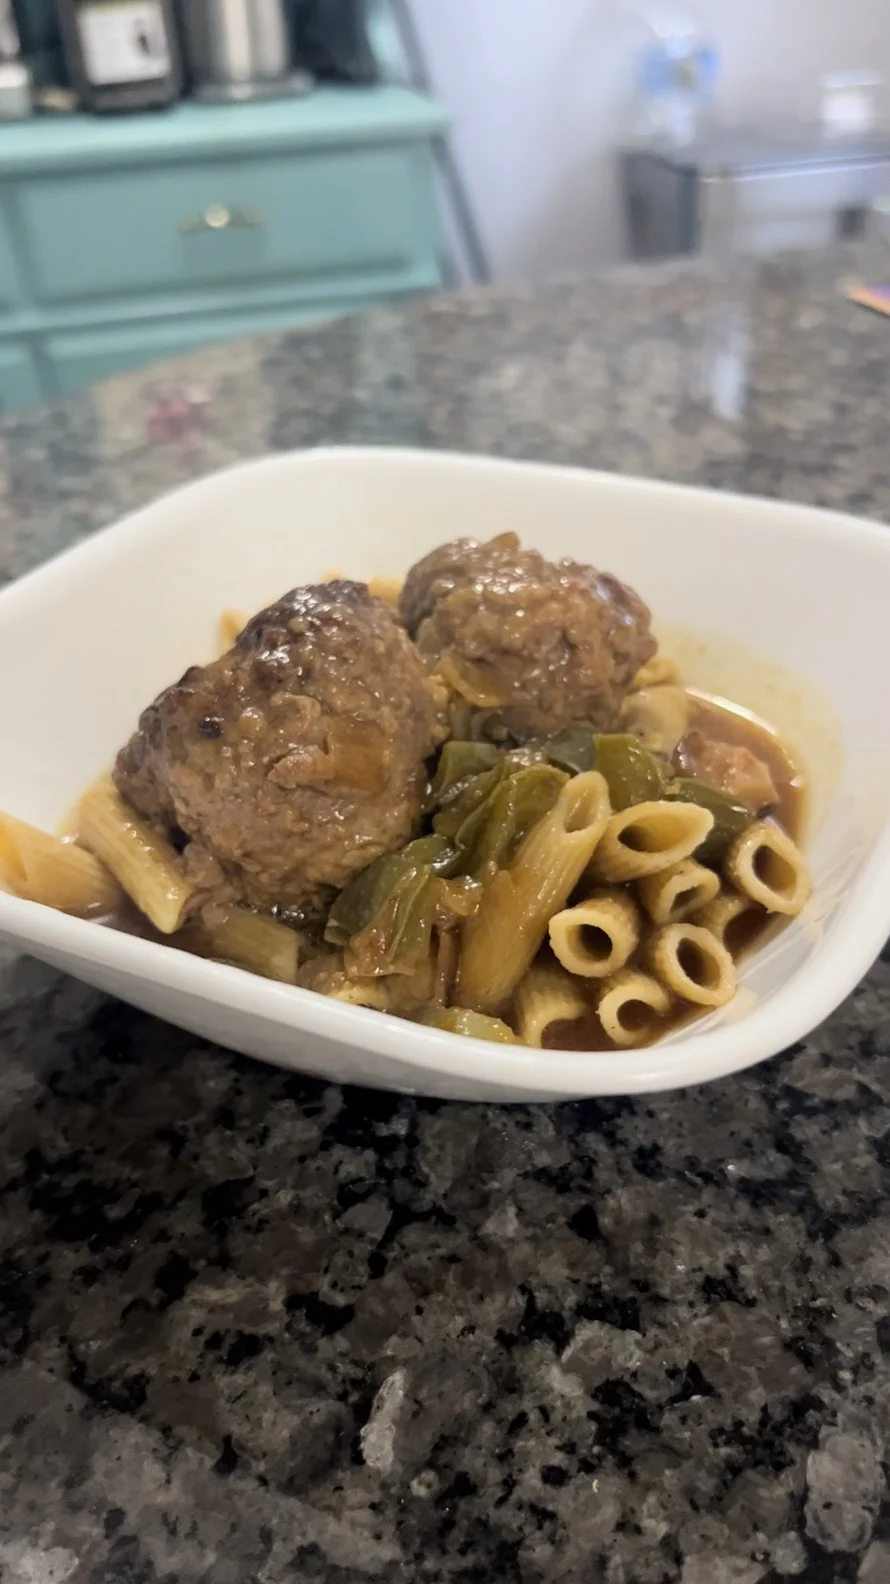
Back again with a fun dinner for you and the family! These meatballs are perfect for this fall weather and hopefully it’ll be a hit! It took me about an hour to make the recipe so it’s a good one to make before you pick the kiddos up from school.
Meatballs and Mushroom Gravy
1 pound Ground Pork
1 pound Ground Beef
1 Bell Pepper Medium Diced, 1 yellow onion medium diced, and 3 cloves of garlic chopped & mixed together in a bowl.
2 cups chopped mushrooms
1 Egg
2 teaspoon salt
2 teaspoon Black Pepper
1/2 cup breadcrumbs
3 Tablespoons butter
1/4 cup AP Flour
1/4 cup red wine
2 cups beef stock
1 Tablespoon Dijon Mustard
1 pound of your favorite Pasta (Cooked)
Git-R-Done
Step one is to make our meatballs. Place your ground meats in a bowl and mix in 1 teaspoon of the salt and pepper, the egg, the breadcrumbs, and 3/4 of a cup of the peppers, onions, and garlic. Mix thoroughly. Melt your butter in a large high sided pan that you can put a lid on. Ball your meatballs up so they’re a little larger than a golf ball and sear on both sides. Remove the meatballs and sweat the remaining pepper & onion mixture. Add your mushrooms and sauté them. Now it’s time to deglaze with the red wine and reduce by about half. Add your beef stock, remaining salt, pepper and the mustard and bring to a slow simmer. Add your meatballs back into the liquid, place a lid on your pan, and cook for 30 minutes. If your pasta isn’t cooked by now this is the perfect chance to do it! After 30 minutes you’re ready to go. Place pasta down first, then a couple of meatballs, and smother that stuff with your gravy! Enjoy!
That’s about the size you’re looking for and the sear color.
Deglazing our pan while enjoying some fine wine.
Click that video to see the positive reviews!
Pro Tip: You can meal prep the meatballs in the gravy and all you need to do is heat and serve.
Pro Tip 2: Pick a red wine you’d like to drink with dinner to cook with and it’ll be an amazing pairing.
Cheers!
Chip

Mini Chicken Pot Pies
Mini Chicken Pot Pies!

Looking for a fun dinner idea for the kids? Then this blog post is for you! Today I’m going to walk you through making mini chicken pot pies. Don’t be intimidated by the amount of steps. All the steps are relatively easy. All you’ll need is a muffin tin and a food processor.
Mini Chicken Pot Pies
Pie Crust
2 2/3 cups of flour
8 ounces (AKA two sticks) of COLD unsalted butter
1/2 cup ice water
pinch of salt
Git-R-Done
The first step is making the pie crust. It is easier to do this in a food processor or mixer but it can be done by hand. Place flour and salt in food processor. Cube up butter and add to the flour. Runn the food processor until the butter has been cut into the flour mixture. You don’t want large chunks of butter in the flour. Now slowly drizzle the water into the flour mixture while running the food processor. The dough should feel sort of like playdough. Place dough on a floured surface and gently work into a ball. You do not want to over mix because the dough will become tough. If you’re going to use the dough right away allow it to rest in the refrigerator for 30 minutes. You can also make this dough and use it the next day or so.
Pie Filling
4 ounces butter (AKA one stick)
1/4 cup of flour
Half an Onion Medium Diced
1/2 cup carrots, Peeled and Medium Diced
1/2 cup celery medium diced
2 cloves of chopped garlic
2 or 3 chicken breasts, cooked and shredded
1 cup of milk
1 cup chicken broth
Git-R-Done
Melt your butter in a large pot. Add your vegetables and cook until the onions are translucent. Try your best not to get any color on the vegetables. Add your flour and cook for a minute or so. You do not want any color on the flour. The flour mixture should look like wet sand so you may need to add more butter or flour to get the correct consistency. Now add your chicken broth and milk and allow to come to a simmer. The liquid should thicken. If it is too thick feel free to add more broth or milk to get the consistency, you like! This can also be done in advance.
Now it’s time for assembly!
Cut your pie dough in half and roll it on a floured surface until it’s about an 1/8 of an inch thick. Depending on the size of your muffin tins you might have to get creative how to cut the dough. I used a rocks glass to cut the dough and i needed to roll it a little more so I had enough dough to Fill the muffin tin. Spray the muffin tin with pan spray for the amount of pot pies you’re making. Lay the dough so it covers the bottoms and the sides of the tin. Now take your filling and fill each pie up a little over 3/4s of the way. Now you need to roll out the tops for your pies! Roll out more pie dough in the same way and the same size to cover them up. Place a piece of dough on top of each pie and press with a fork where the two pieces of dough touch to seal. Take a small knife and cut a slit on top so steam can escape while you’re baking.
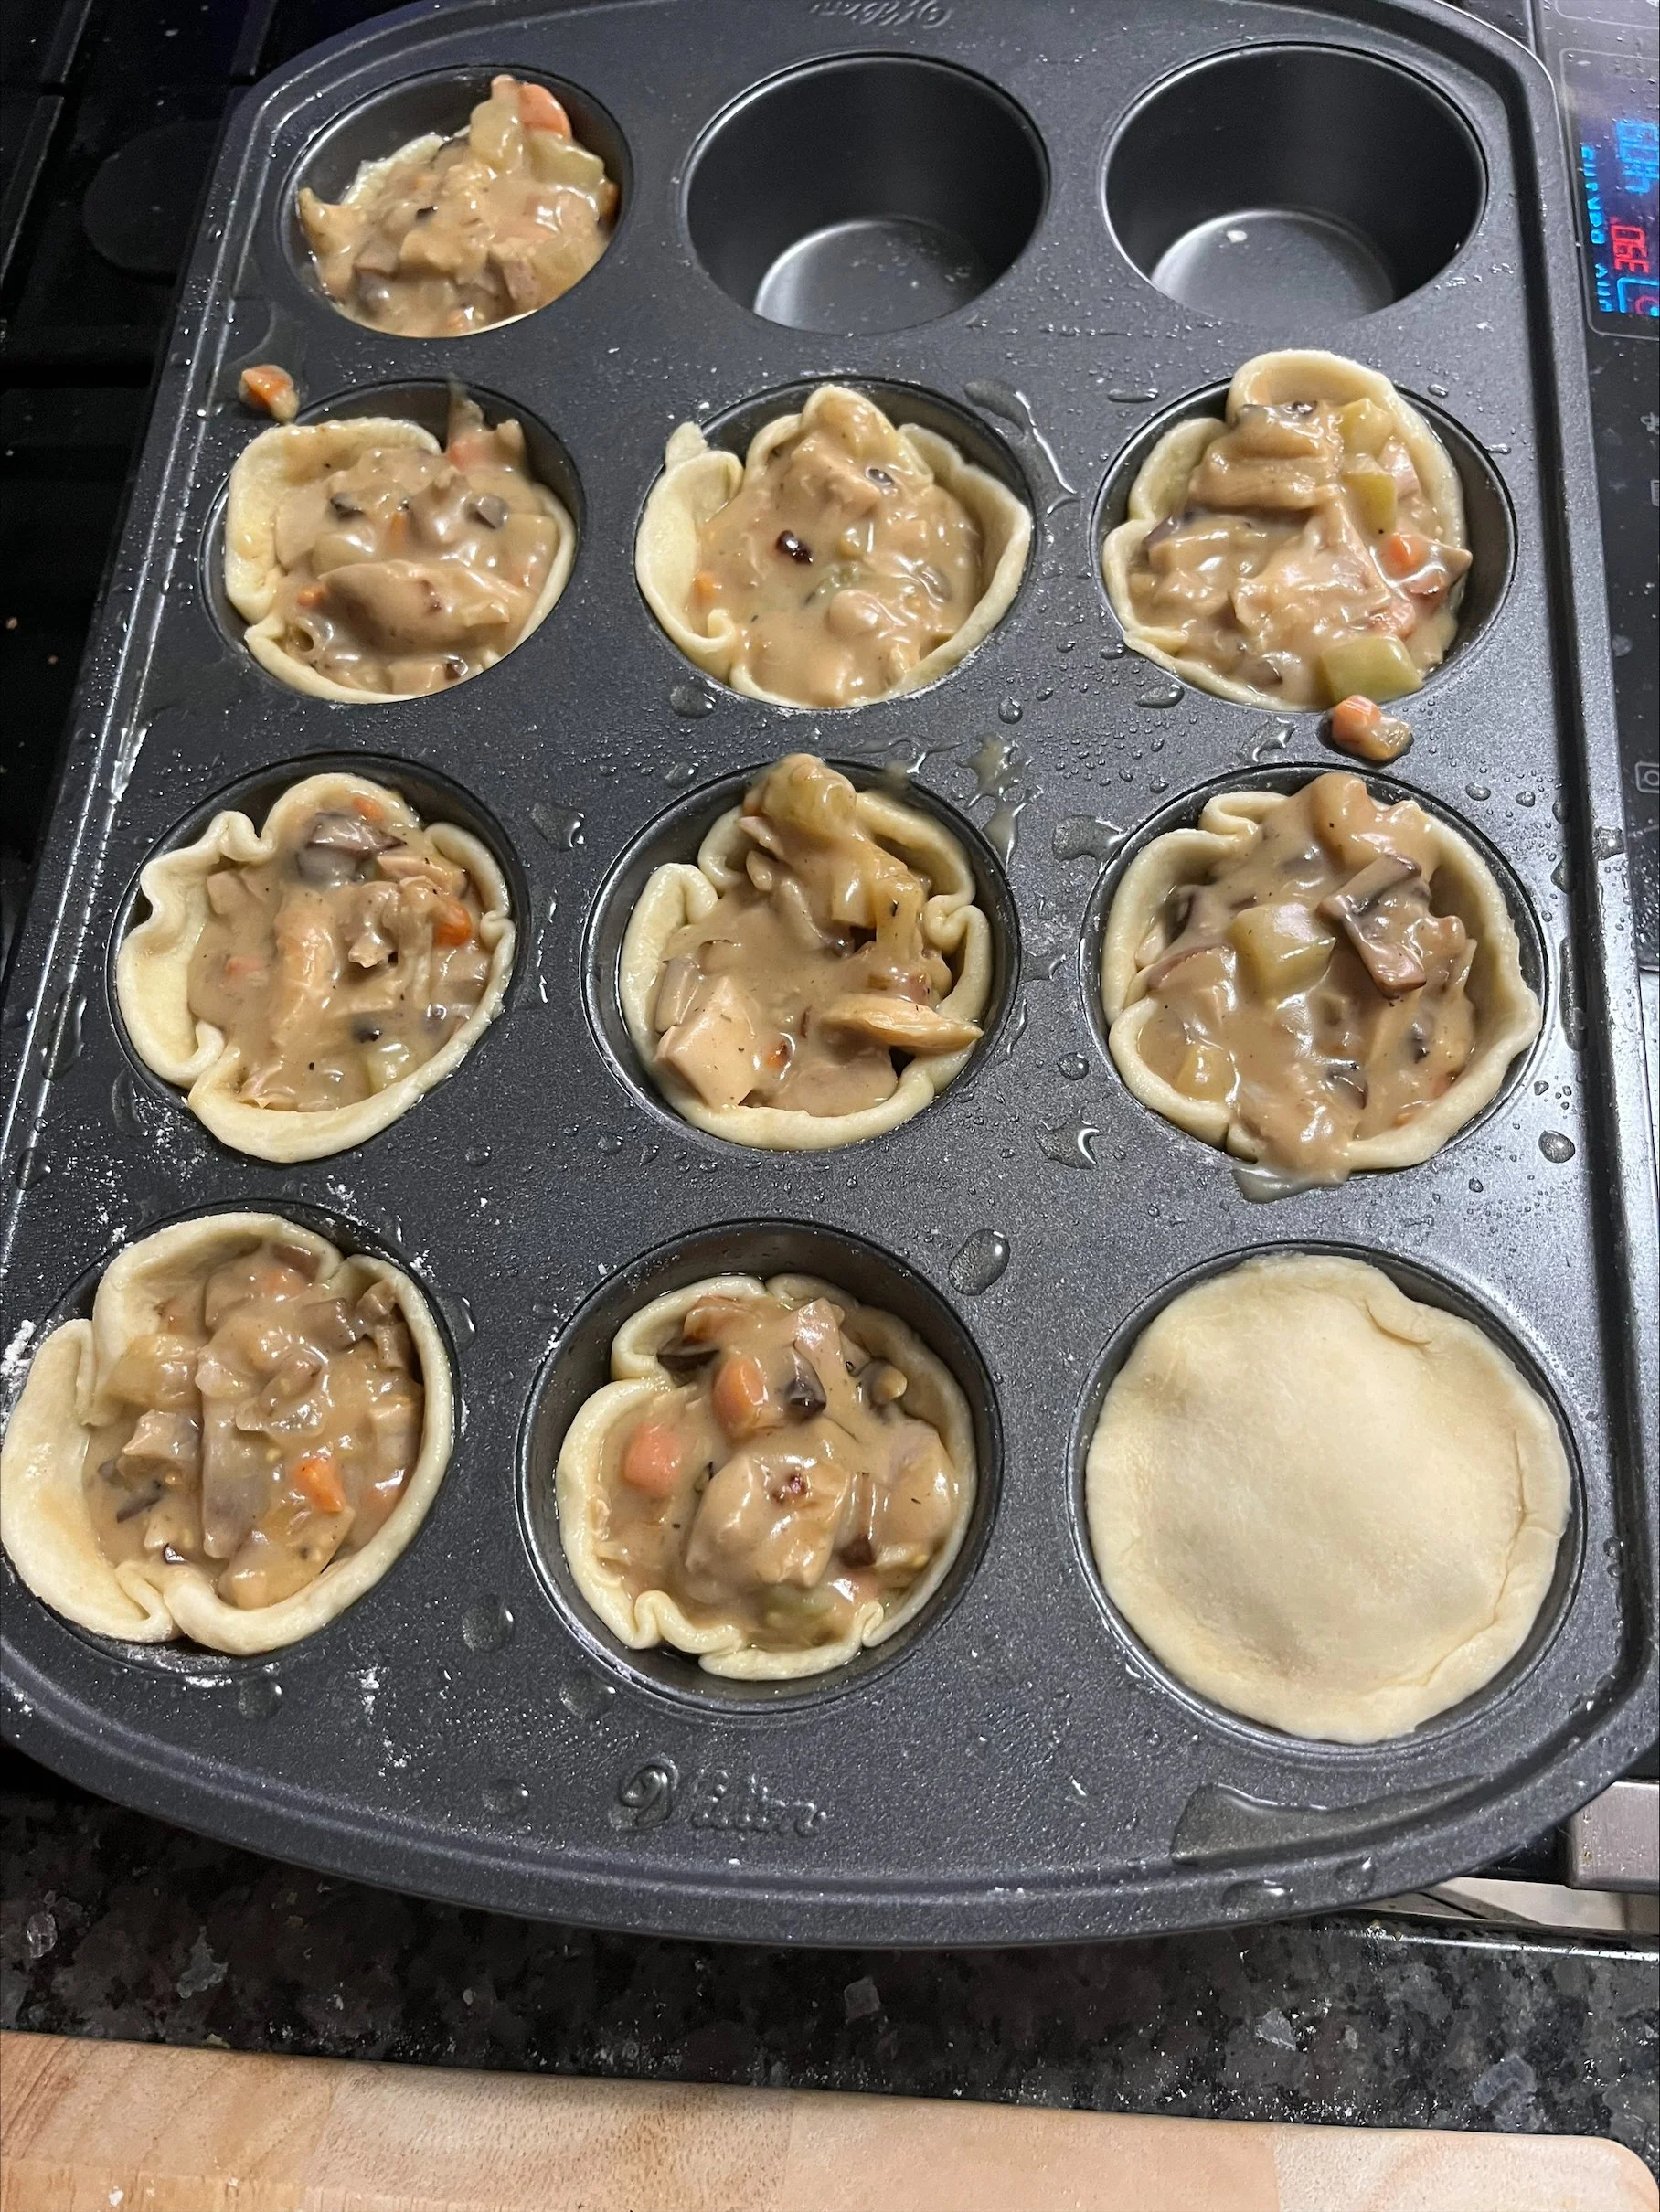
Filling up the pies.

Filled and Topped Pies
SHAKE AND BAKE
Set your oven to 400 degrees for and bake for about 20 minutes. I always start at 20 minutes and bake longer if i need to. The dough should be slightly browned and firm to the touch. Allow to cool for 15-20 minutes and you should be good to go!
Pro Tip: You could use store bought pie crust if you’re looking to save time.
Pro Tip 2: Feel free to add some frozen peas to the filling.
Cheers!
Chip

How to make a sourdough starter!
How to make a sourdough starter

Baking sourdough is time consuming but it is well worth it! It’s a great activity to do with your family on a weekend. At the restauramt we often have sourdough toast on our charcuterie boards and we also use sourdough for our English Muffins!
Sourdough Starter
The Ingredients
250 grams of All Purpose Flour
250 grams of room temperature water
Glass or plastic container large enough to hold all the ingredients
Git-R-Done
What you’re going to do is weigh the flour and water separately and combine them in your vessel. Mix them with your hand. if your container has a lid, do not close it all the way so the gas can escape. Otherwise you can cover the container with plastic wrap and poke holes in the plastic. Store the starter on the counter in your kitchen for 24 hours. Now you’re going to need to feed the starter every 12 hours by doing this: Mix together 250 grams of flour and water with 150 grams of the old starter. After 6 feedings the starter will be ready for baking!
Pro Tip: Add some starter to pancake batter for sourdough pancakes.
Pro Tip 2: After 6 feedings you only need to feed the starter once a day.
Cheers!
Chip

Watermelon Gazpacho
Watermelon Gazpacho from Magnolia and May

The kids are back and school which means summer is almost over! What better way to hold onto the summer season than with some Watermelon Gazpacho!! This recipe is simple and delicious!
Watermelon Gazpacho
The Ingredients
4 cups of chopped up watermelon
1 lime zested and juiced
1/4 cup of fresh basil
1/4 cup of fresh mint
a pinch of salt
Git-R-Done
Step 1: Place all ingredients in a blender.
Step 2: Blend until smooth.
Step 3: Serve in chilled soup bowls.
Pro Tip: Depending on the size of your blender you may have to make the gazpacho in batches.
Pro Tip 2: Basil Pesto is a great garnish for this!
Cheers!
Chip

Lemmon Muffins!
Lemmon Muffins from Magnolia and May

Who doesn’t love a good muffin? This muffin recipe is simple and it’s a hit. You can jazz it up by adding chocolate chips (like in the picture) or by adding some fruit like diced strawberries. Amanda and I like to make a dozen and freeze them so we can warm them up in the morning for the kid’s breakfast.
Lemon Muffins
The Ingredients
4 c All Purpose Flour
2 Tablespoons Baking Powder
2 Teaspoons Lemon Zest
4 eggs
2 Tablespoons Lemon Juice
2 teaspoons vanilla extract
2 3/4 cups Heavy Cream
Git-R-Done
Step 1: Preheat oven to 325
Step 2: Combine the dry ingredients in one bowl.
Step 3: In another bowl whisk together the wet ingredients.
Step 4: Add the dry ingredients and mix until combined. DO NOT OVER MIX.
Step 5: Spray muffin tins with pan stray and fill them with the batter two thirds of the way.
Step 6: Bake for 15 minutes or until a toothpick comes out clean.
Pro Tip: Add 1 cup of Chocolate Chips to make Chocolate Chip Muffins. (You can even add 2 cups!)
Pro Tip 2: Milk can be substituted for the Heavy Cream.
Cheers!
Chip
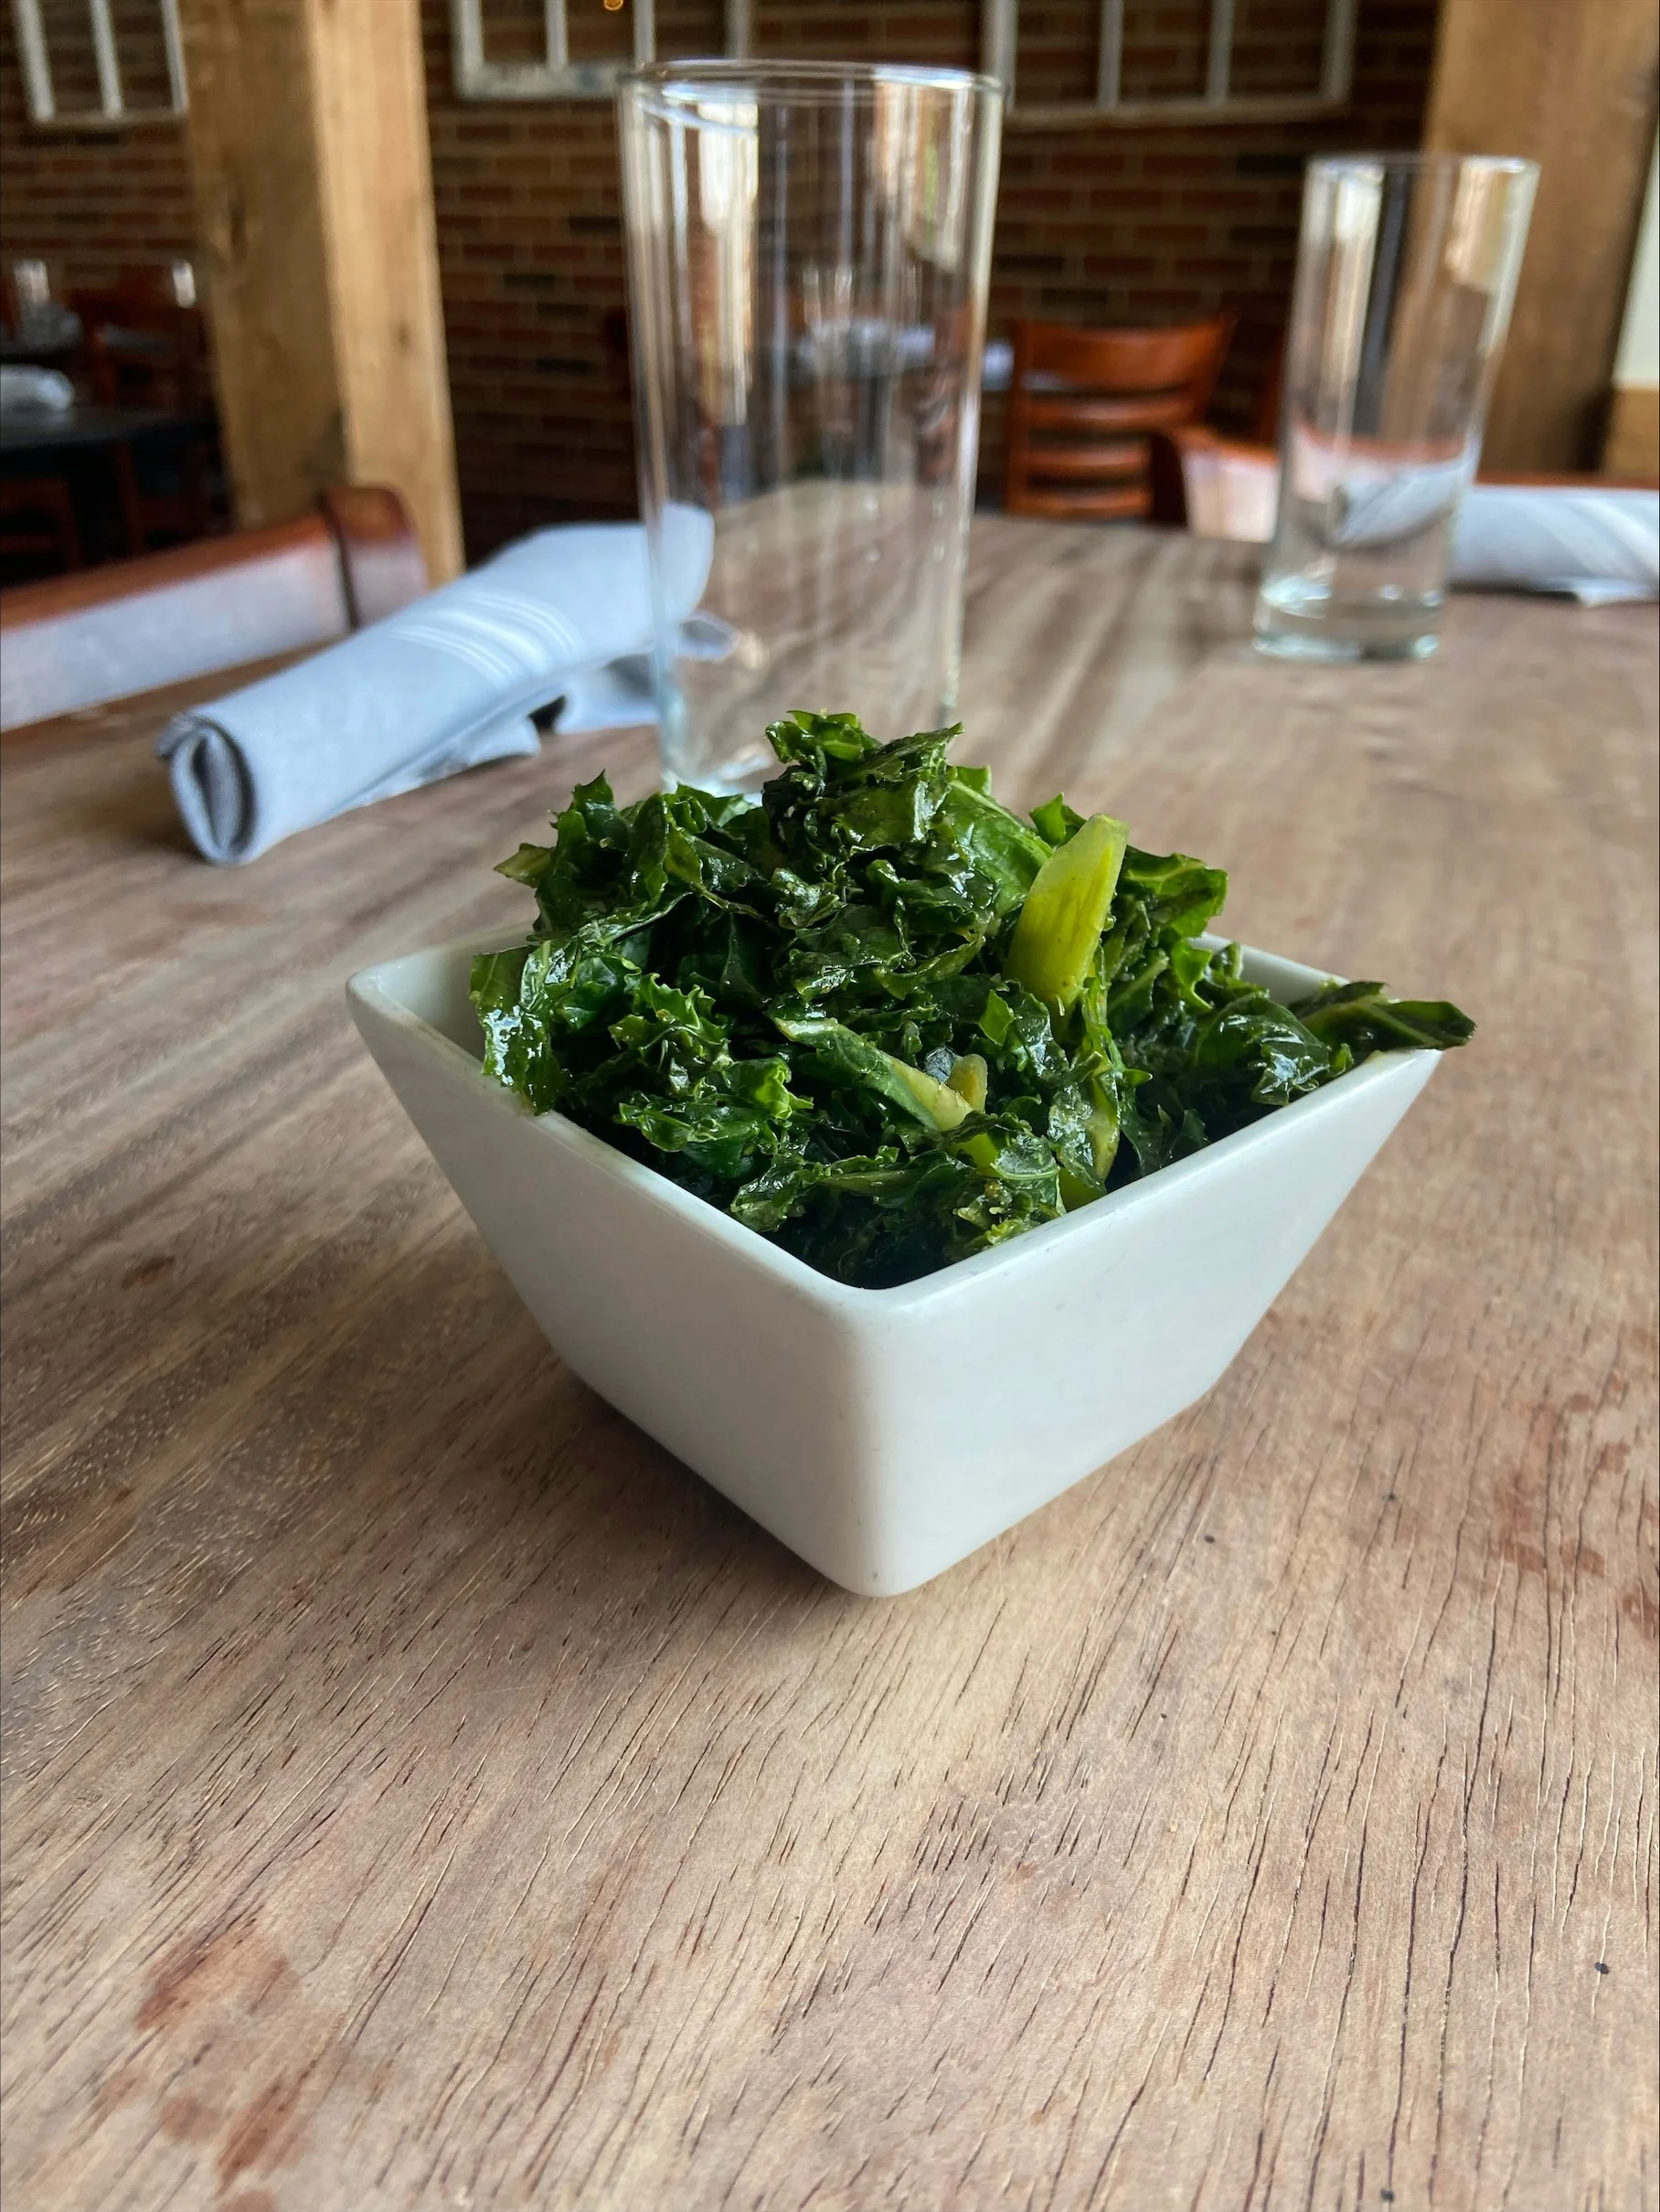
Soy-Ginger Dressing
Soy-Ginger Dressing from Magnolia and May

Here’s another classic from your favorite restaurant! Many of you have enjoyed the kale slaw and now you’ll be able to make it yourself! This soy-ginger dressing is the key to making our world famous kale slaw. This is also great for a regular ole salad or marinading a steak!
Soy-Ginger Dressing
The Ingredients
1/4 cup Olive Oil
1/4 cup Apple Cider Vinegar
2 Table spoons soy sauce
1 teaspoon sesame oil
2 whole green onions with the root removed
2 Tablespoons peeled and chopped fresh ginger
1 bunch cilantro
1/4 fresh jalapeno, seeds removed
pinch of sugar and salt
Git-R-Done
Step 1: Place ingredients in blender and blend until smooth.
Pro Tip: Add extra Jalapeno if you want it a little spicier.
Pro Tip 2: The Kale Salad mix from the grocery store would be perfect to make Kale Slaw!
Cheers!
Chip

Creme Brulee
The Best Creme Brulee EVER
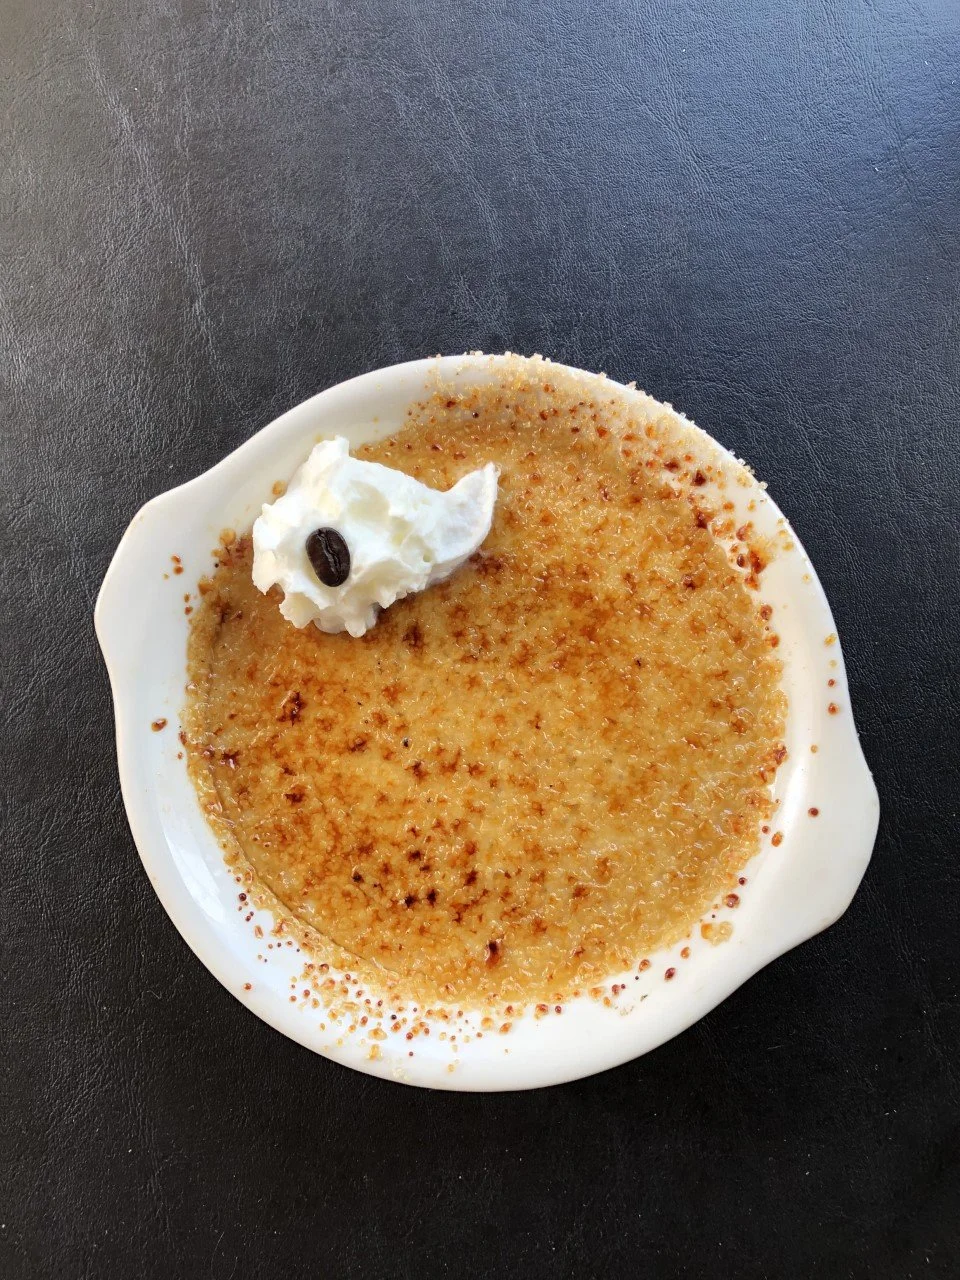
Time for a classic way to indulge your sweet tooth! Creme Brulee is one of my all time favorites and its a classic that you can use for a dinner party or just for an at home date night with your significant other. It’s easy to execute but make sure you pay attention to detail!
Vanilla Creme Brulee
The Ingredients
1 Quart of Heavy Cream
1 cup sugar
3/4 cup egg yolks
1 Tablespoon Vanilla Extract
Git-R-Done
Step 1: Bring Cream and half a cup of the sugar to a boil.
Step 2: Mix the other half cup of sugar with the yolks and vanilla extract.
Step 3: Slowly add the hot cream to the egg yolk mixture while constantly whisking the yolks.
Step 4: Pre-heat oven to 300 degrees Fahrenheit.
Step 5: Pour the Creme Brulee base into ceramic baking dishes.
Step 6: Bake in a water bath for 45 minutes.
Step 7: After 45 minutes gently shake the brulees. If they jiggle like jello remove from the water bath and place them in the refrigerator to cool down. If they aren’t done check them every 10 minutes.
Step 8: Now that you’re ready to serve them sprinkle sugar in the raw and cover the brulee. Remove any excess.
Step 9: Caramelize the sugar with a propane torch.
Step 10: Enjoy it!
Pro Tip: You can get a propane torch at Home Depot or Lowes
Pro Tip 2: Be careful when you’re boiling the cream because it will boil over all over the stove!
Cheers!
Chip

French Toast Batter
The Best French Toast Ever

Still need an idea for that Easter Brunch you’re hosting? Not to fear FRENCH TOAST IS HERE! This is the same French Toast recipe we use at brunch and now I’m passing it on to you.
French Toast Batter
The Ingredients
1 cups Milk
1 cups Heavy Cream
5 eggs
1 tablespoon cinnamon
1 teaspoon Vanilla Extract
4 Tablespoons Maple Syrup
Git-R-Done
Step 1: Place all ingredients (if they fit) in a blender.
Step 2: Blend until Smooth.
Step 3: If all the ingredients don’t fit, blend in two batches.
Step 4: Pour into large bowl.
Step 5: Now it’s time to make your French toast!
Step 6: Over medium heat melt a tablespoon of butter in a sauté pan.
Step 7: Once the butter is melted dip a piece of bread in the French toast batter and place in pan.
Step 8: Cook until the bread is golden brown on both sides.
Step 9: Enjoy it!
Pro Tip: Eat your French toast with the Bacon Marmalade from our previous post.
Pro Tip 2: Pairs well with mimosas!
Cheers!
Chip

Honey Ham Brine
World Salad Dressing Champion

Easter is just around the corner and yes, I would rather you and your family come to brunch at Magnolia and May but in case you aren’t I’m going to give you the recipe for a KILLER honey ham! This ham can be the center piece for a memorable brunch at home with the family and guess what? It’s super easy to make!
Honey Ham Brine
The Ingredients
One Ham (Can be bone in or boneless)
1 gallon of water
1/2 cup Salt
2 cups of Honey
1 bunch Rosemary
1 bunch thyme
5 cloves of Garlic
1 Tablespoon ground Black Pepper
1 Tablespoon Red Pepper Flake
Git-R-Done
Step 1: Place all ingredients (Except the ham) in a pot and boil to make the salt and honey disolve.
Step 2: Place Ham in a vessel large enough to hold ham and brine.
Step 3: Allow brine to cool.
Step 4: Cover Ham in brine and let sit in the refrigerator for a week.
Step 5: Pull ham off brine after a week and cook it!
Pro Tip: Do not use a spiral cut ham for this. For the most part they come already cooked and seasoned.
Pro Tip 2: You can use this for pork chops! Just brine the chops overnight and you’re good to go.
Cheers!
Chip

Buttermilk Dressing
World Salad Dressing Champion

Sorry I missed last week but we are back this week with another fan favorite, buttermilk dressing! This stuff is great on a salad or as many of you know its a great dipping sauce. All you need is a few ingredients and a blender!
Buttermilk Dressing
The Ingredients
1/4 cup chopped onion
2 garlic cloves
1 oz red wine vinegar
1 oz lemon juice
2.5 cups mayonnaise
1/2 an ounce of hot sauce
Pinch of salt and pepper
Git-R-Done
Step 1: Place first four ingredients in the blender
Step 2: Blend until smooth
Step 3: Transfer to a bowl
Step 4: Add remaining ingredients and mix until combined.
Pro Tip: Duke’s mayo is our preference for this!
Pro Tip 2: We use a vita mix blender but whatever you have will work!
Cheers!
Chip

The best pancakes, Jerry. The best!
The best pancakes, the best!

Back at it again this week with some more brunch time favorites!! This week we are diving into our pancake recipe. To answer your question yes, I would rather you come into the restaurant and purchase our pancakes (I have tuition payments to make). However, I understand that sometimes for reasons outside of your control you need to make pancakes at home. Shout out to one of our favorite brunch guests who inspired this post!
Pancakes
The Ingredients
3.5 cups of All Purpose Flour
2 tablespoons of Baking Powder
1 Tablespoon of Sugar
6 eggs
2 sticks of butter
3 cups of buttermilk
1 teaspoon of salt
Git-R-Done
Step 1: Place all dry ingredients into one bowl
Step 2: Mix together all wet ingredients in a different bowl
Step 3: Add wet ingredients to dry ingredients and mix well.
Step 4: Melt butter in a skillet over medium heat.
Step 5: When the pancakes start to bubble its time to flip ‘em!
Step 6: Brown on the other side of the pancake.
Step 7: Eat!
Pro Tip: If you have a Black Stone outdoor griddle that baby works great for pancakes!
Pro Tip 2: When you put you pancakes in the pan add your favorite fruit!
Pro Tip 3: Savory pancakes are awesome! Ham and Green Onions maybe?
Cheers!
Chip

World Famous Bacon & Onion Marmalade
bacon, Bacon, BACON!!

If you’ve been to the restaurant, I’m sure you’ve seen our bacon marmalade on the pimento cheese dish. I bet you didn’t know that this goodness is more versatile than serving with pimento cheese. You can use it on sandwiches or even charcuterie & cheese boards!
Bacon & Onion Marmalade
The Ingredients
2 cups of Diced Yellow Onions
2 cups of Diced Bacon
1 1/2 cups of Cider Vinegar
5 cups of White Sugar
1 Green Bell Pepper seeded and diced
1 Red Bell Pepper seeded and diced
Git-R-Done
Step 1: Cook Bacon until light brown.
Step 2: Add onions and cook until translucent.
Step 3: Remove bacon & onions from pot and dispose of the bacon fat.
Step 4: Add vinegar and sugar and bring to a boil.
Step 5: Wait until the sugar is dissolved and add the peppers and simmer for 10 minutes.
Step 6: Add bacon and onions and simmer for an additional 10 minutes.
Step 7: You did it!
Pro Tip: When dissolving the sugar stir it so the sugar doesn’t stick to the bottom.
Pro Tip 2: Goes great with a roast beef sandwich!
Cheers!
Chip

NO SOUP FOR YOU!!! Just Kidding, Let's make some Beer Cheddar Soup!
No Soup for you!! Just Kidding :)

It’s gonna be cold this weekend. What better way to warm up than making a nice warm bowl of soup! This soup is a midwestern classic, Beer Cheddar Soup. This soup is very easy to make, and it can be eaten ASAP, or you can store it for meal prepping.
Beer Cheddar Soup
The Ingredients
3 ribs of Celery
1 onion
1 potato
1 carrot
2 gloves of garlic
1 stick of butter
3/4 cup of flour
1 12 ounce Budweiser (or your favorite beer!)
1/2 gallon of water
1.5 cups cheddar cheese
Git-R-Done
Step 1: Rough chop your veggies. They don’t need to look good because you’re pureeing it in the Blender.
Step 2: Melt your butter and then add the flour. You’re making a blonde roux. Cook it for about 5 minutes. You don’t want any color on the flour.
Step 3: Add your veggies to the pot and saute for 5 minutes.
Step 4: Add your beer and water.
Step 5: Cook until the veggies are soft. (The potato and carrots are usually the last ones to get soft)
Step 6: Add the cheese and melt it.
Step 7: Puree in blender until smooth.
Step 8: Season with salt and pepper.
Step 9: Enjoy!
Pro Tip: When you add your cheese be careful not to let the cheese burn on the bottom of the pot.
Pro Tip 2: IPAs are delicious but aren’t great for this soup. I typically use a lager or Golden Ale.
Pro Tip 3: Bacon and Basil Pesto are great Garnishes!
Cheers!
Chip
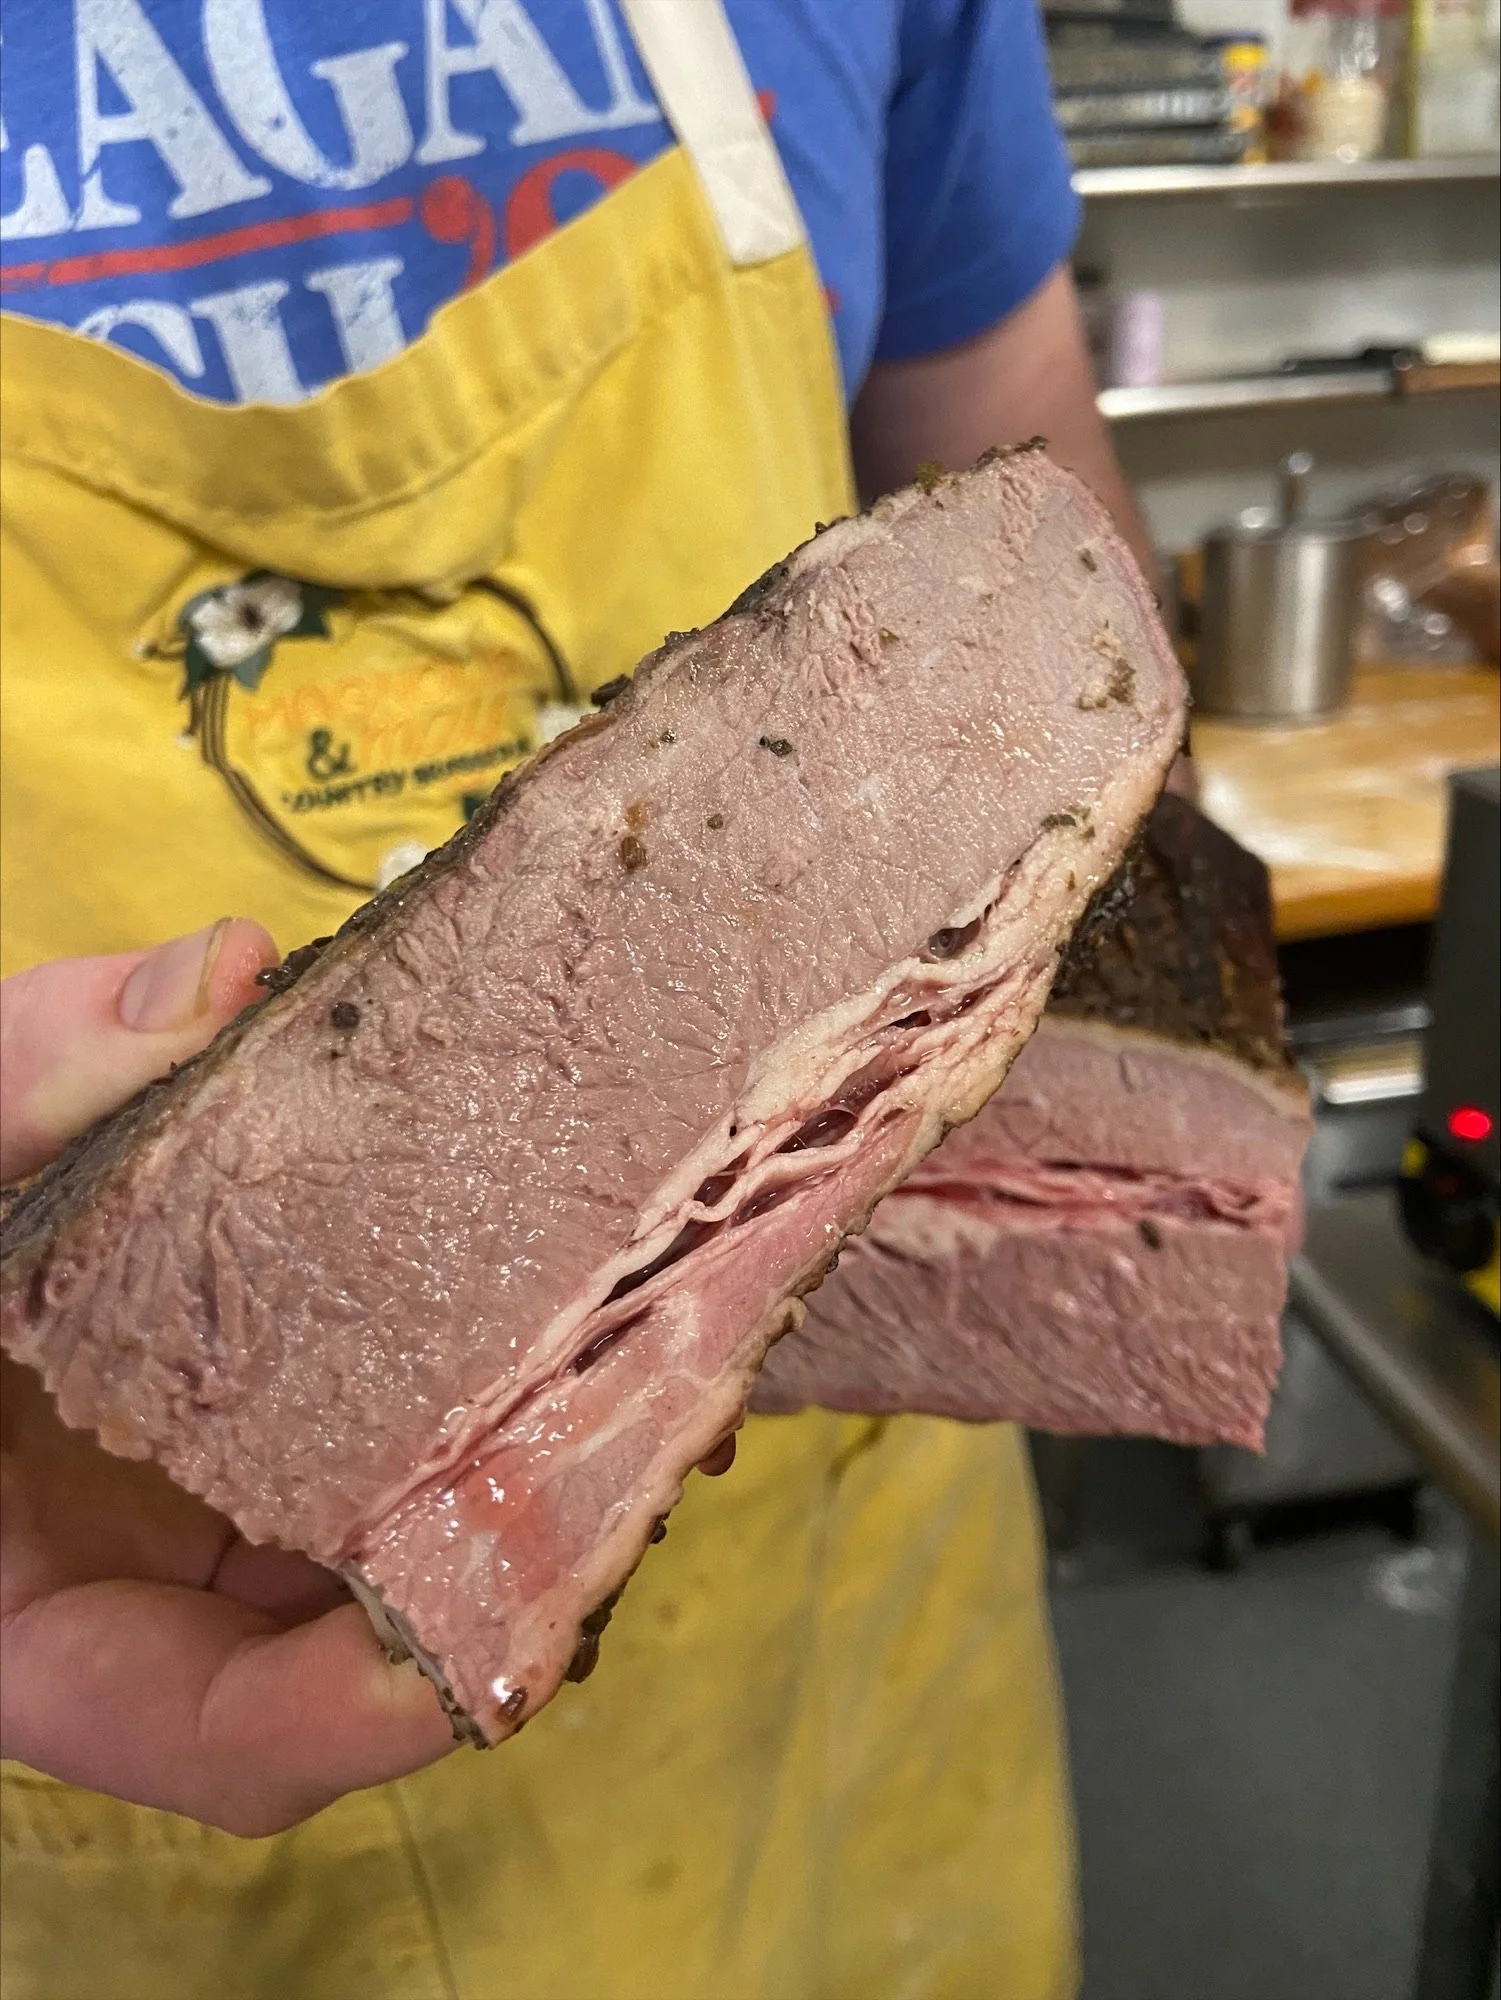
Lets Make Some Pastrami!
Lets brine some pastrami!!!

Have y’all ever had our WORLD FAMOUS pastrami sandwich? Well, now you don’t have to wait until Thursday and Friday lunch to have it. I’m gonna give you all the tool to make it yourself at home! Don’t have a smoker or a Webber Grill? Don’t worry! You can braise this bad boy in the oven and now you have corned beef for a Reuben. We use a beef brisket from Home Place Pastures in Mississippi. You can order one online (YES, THEY DELIVER!) or stop by their store (It’s only 45 minutes away from Memphis) and get some. Otherwise, a brisket from the store will suffice. The hardest part about this recipe is to wait an entire week until you can enjoy it.
Pastrami Brine
The Ingredients
1 Beef Brisket (Doesn’t matter the size. Buy what you know you’ll eat so you don’t waste it.)
1 gallon of water
1 cup pickling spice (Yes. The pickling spice in the spice section at Kroger.)
½ cup salt
4 gloves of garlic
½ a bunch of thyme and rosemary (Feel free to leave this out if you don’t want to buy the herbs.)
¼ cup white sugar
Git-R-Done
Step 1: Place all the ingredients (except the beef) in a pot and bring to a boil.
Step 2: Place the Brine in a container that will hold both the liquid and the beef in a refrigerator. Cool the brine down.
Step 3: Feel free to trim off any excess fat on the meat. Leave it on there if you want to as well. ITS YOUR WORLD!
Step 4: Once the brine has cooled down place your beef into the liquid for a week.
Step 5: Flip it over every day or so just to make sure everything is brined evenly.
Get Smokin (or Cookin)
There are a few different ways you can cook the brisket. You can smoke it in a smoker (If you have one) or smoke it on your grill the way you would do pulled pork or ribs, or you can braise it.
For Smoking: You are going to want to smoke it until its 170 degrees. We want it tender but not falling apart so you can slice it.
For Braising: If you braise it cook it in your oven set at 350 degrees in water until it’s the meat is 170 degrees.
Pro Tip: You want the final product to be tender but not fall apart, we like to slice ours and use it for sandwiches.

Cheers!
Chip
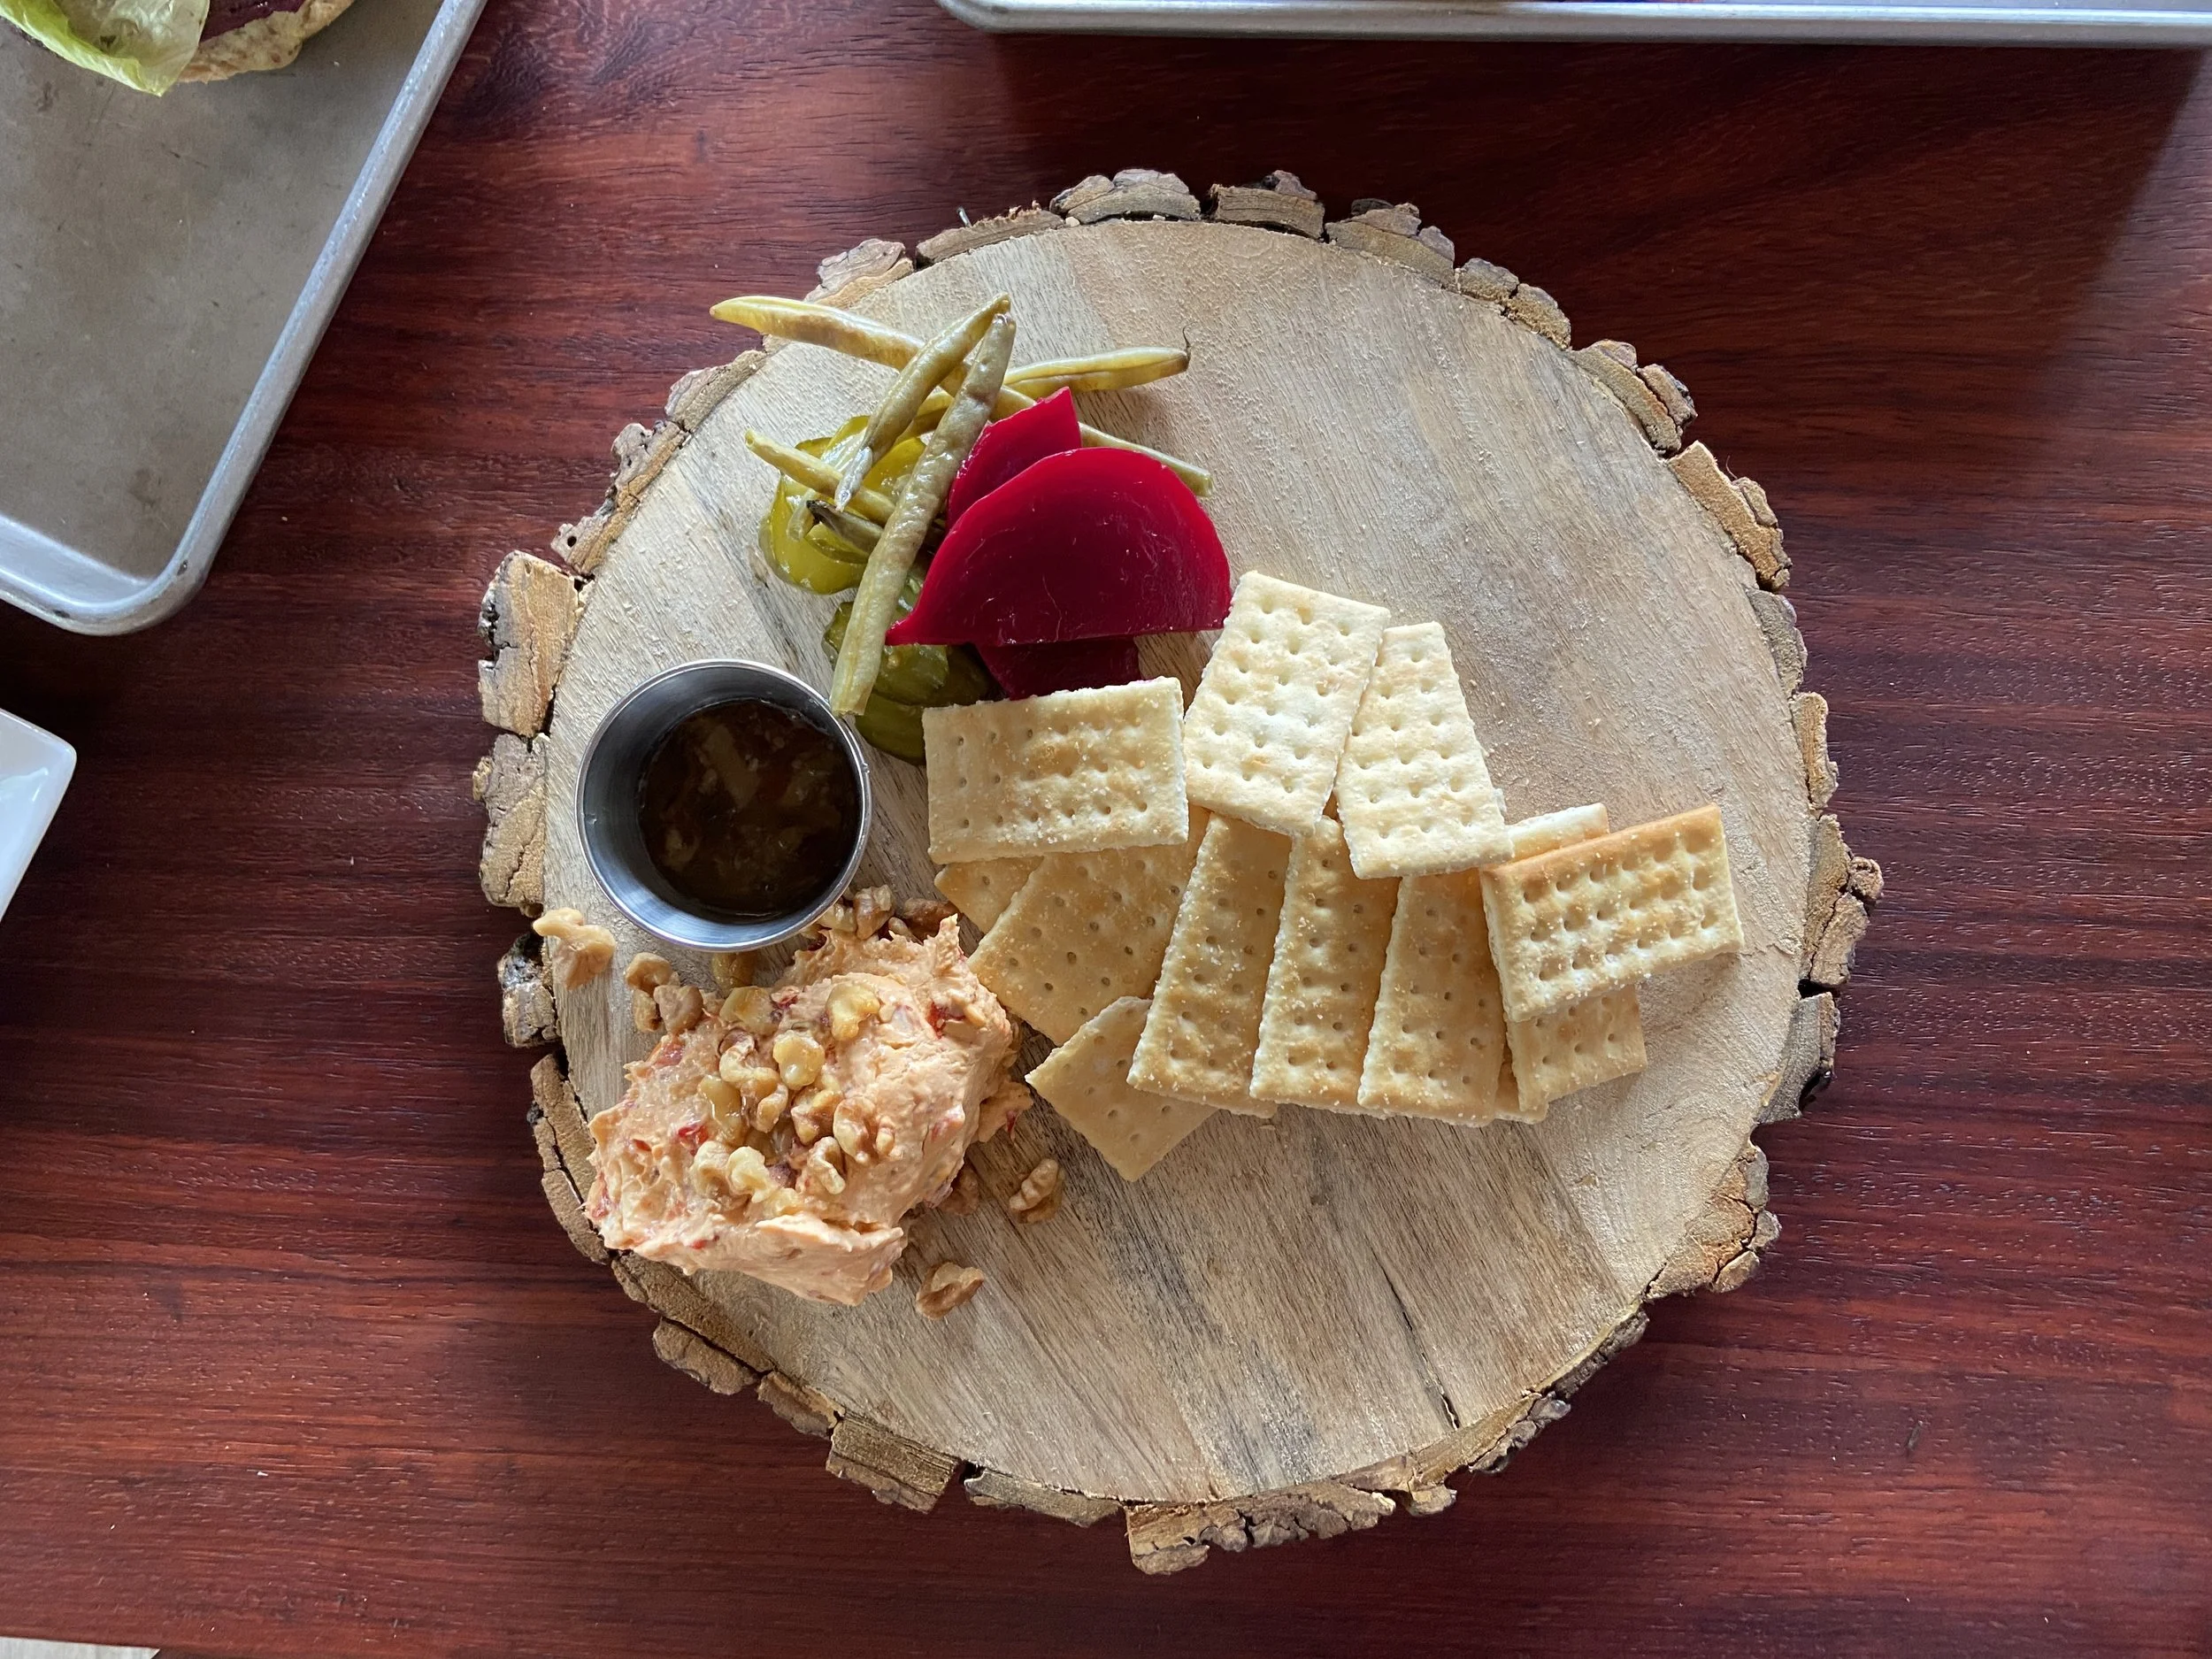
Pimento Cheese to the Rescue!!!!
Pimento Cheese; But wait its smooth & creamy!!

Happy Thanksgiving y’all!!! If you’re still looking for a great sharable app for the Thanksgiving holiday or any holiday gathering this is post is for you. Pimento Cheese is a southern classic and ours is no exception! It has been on our menu since day one and now y’all can make it at home! I like to serve it like a dip with crackers and pickles, but it makes a mean grilled cheese or even Amanda’s favorite a BLT with pimento cheese on wheat bread.
Pimento Cheese
The Ingredients
1 ½ pounds cream cheese, softened
4 cups Shredded Cheddar and Jack Cheese
27 oz canned pepper relish (LeGout is the brand we use)
1 cup chicken stock
1.5 oz Worcestershire
1 oz Hot Sauce
1 oz chopped garlic
How it’s done
Step 1: Pull cream cheese out and let soften at room temperature.
Step 2: Combine last five ingredients in a large saucepan and reduce by one third.
Step 3: Whisk in cream cheese until smooth.
Step 4: Add the other cheese, again whisk until smooth.
Step 5: Cool down
Step 6: Serve with your favorite crackers and pickles
Pro Tip (From Amanda): Pimento Cheese, with Bacon, Lettuce & Fried Green Tomatoes is the best sandwich ever!
Cheers!
Chip